Running a keyed transaction with the iframe
| Background |
|---|
Before starting this tutorial, make sure you understand the following topics from the Quick start section:
|
You can use the retail iframe to run a keyed transaction through a terminal for a card or echeck. With the retail iframe, you can also select saved payment methods to use for running the keyed transaction.
These steps are similar to the process you use with the ecommerce iframe.
You can control the fields that display in the iframe, as well as the style of the iframe. For more information about these, see the Customizing the retail iframe topic.
To run a keyed transaction with the Nexio retail iframe, do the following:
-
Decide which authentication method to use:
- By using Simple login for trusted users. You will include the
simpleLoginkey and value in thesrcof the iframe in the following steps. - By requiring users to enter their Nexio user credentials when they access the https://retail.nexiopaysandbox.com page. You will not include the
simpleLoginkey in thesrcof the iframe.
- By using Simple login for trusted users. You will include the
-
Add the iframe to your web page and specify a
srcfor it (or access the https://retail.nexiopaysandbox.com page directly) that includes any desired settings. -
To add the optional settings, for the
srcof the iframe, you include a setting after the retail URL. For example, take some JSON body content that you might use for a transaction, such as the following:{ "card": { "cardHolderName":"John H. Doe" }, "data": { "customer": { "customerRef":"customer123", "birthDate":"2000-01-01" } }, "uiOptions": { "hideCustomerInfo":false, "hideBilling":false, "hideShipping":false } }For this example, the system would prefill the Name field in the Card section and the Customer Reference Number and Date of Birth fields in the Customer Information section of the iframe. The iframe would also display the Customer Information, Billing Information, and Shipping Information sections, along with the regular required fields, such as in the Card Information section.
Other settings may be included to save a card token or to do an auth-only transaction.
With the given JSON, you need to URL encode or escape the value so you can include it in thesrcvalue (or in the URL). You can do this manually or programmatically. See the programmatic method in step 4. For doing it manually, it would look like one of the following, depending on how you are using the string:%7B%22card%22%3A%7B%22cardHolderName%22%3A%22John%20H.%20Doe%22%7D%2C%22data%22%3A%7B%22customer%22%3A%7B%22nationalIdentificationNumber%22%3A%22123-45-6789%22%2C%22birthDate%22%3A%222000-01-01%22%7D%7D%2C%22uiOptions%22%3A%7B%22hideCustomerInfo%22%3Afalse%2C%22hideBilling%22%3Afalse%2C%22hideShipping%22%3Afalse%7D%7D{\"card\":{\"cardHolderName\":\"John H. Doe\"},\"data\":{\"customer\":{\"nationalIdentificationNumber\":\"123-45-6789\",\"birthDate\":\"2000-01-01\"}},\"uiOptions\":{\"hideCustomerInfo\":false,\"hideBilling\":false,\"hideShipping\":false}}For more information on these and the other settings, see the Customizing the retail iframe topic.\
-
The following are examples of how to build the URL with simple login or without. Also, when not using simple login, you could include the URL directly in the
srcinstead of using JavaScript or another language to dynamically set the value.<html> <head> <title>Retail Transaction</title> <link rel="stylesheet" href="mystyle.css"> </head> <body> <script> function getSimpleLogin() { fetch('http://localhost:3000/', { method: 'GET' }).then(function (response) { return response.json(); }).then((objData) => { console.log('------->response Data', objData); // Define your more complex settings JSON object let settings = { "card": { "cardHolderName":"John H. Doe" }, "data": { "customer": { "customerRef":"customer123", "birthDate":"2000-01-01" } }, "uiOptions": { "hideCustomerInfo":false, "hideBilling":false, "hideShipping":false } }; // Convert the JSON object to a string and URL-escape it let settingsEscaped = encodeURIComponent(JSON.stringify(settings)); // Append the escaped settings string to your URL let iframe = document.getElementById('myIframe'); iframe.src = 'https://retail.nexiopaysandbox.com/?simpleLogin=' + objData.key + '&settings=' + settingsEscaped; }); } getSimpleLogin(); </script> <div> <h3>Retail Transaction</h3> <p>Complete all required information:</p> <iframe id="myIframe" name="myIframe" src=""></iframe> </div> </body> </html><html> <head> <title>Retail Transaction</title> <link rel="stylesheet" href="mystyle.css"> </head> <body> <script> function buildUrl() { // Define your complex settings JSON object let settings = { "card": { "cardHolderName": "John H. Doe" }, "data": { "customer": { "customerRef": "customer123", "birthDate": "2000-01-01" } }, "uiOptions": { "hideCustomerInfo": false, "hideBilling": false, "hideShipping": false } }; // Convert the JSON object to a string and URL-escape it let settingsEscaped = encodeURIComponent(JSON.stringify(settings)); // Append the escaped settings string to your URL let iframe = document.getElementById('myIframe'); iframe.src = 'https://retail.nexiopaysandbox.com/?settings=' + settingsEscaped; } buildUrl(); </script> <div> <h3>Retail Transaction</h3> <p>Complete all required information:</p> <iframe id="myIframe" name="myIframe" src=""></iframe> </div> </body> </html><html> <head> <title>Retail Transaction</title> <link rel="stylesheet" href="mystyle.css"> </head> <body> <div> <h3>Retail Transaction</h3> <p>Complete all required information:</p> <iframe id="myIframe" name="myIframe" src="https://retail.nexiopaysandbox.com/?settings=%7B%22card%22%3A%7B%22cardHolderName%22%3A%22John%20H.%20Doe%22%7D%2C%22data%22%3A%7B%22customer%22%3A%7B%22nationalIdentificationNumber%22%3A%22123-45-6789%22%2C%22birthDate%22%3A%222000-01-01%22%7D%7D%2C%22uiOptions%22%3A%7B%22hideCustomerInfo%22%3Afalse%2C%22hideBilling%22%3Afalse%2C%22hideShipping%22%3Afalse%7D%7D"></iframe> </div> </body> </html>
-
Create an event listener on the frontend webpage to monitor actions in the iframe. This listener keeps your code updated on what is happening inside the iframe. You handle the success, error, and loading states here.
See our Iframe events table for a list of possible events.window.addEventListener('message', function messageListener(event) { if (event.origin === iframeUrl) { // switch on event.data properties // (e.g. loaded, formValidations, error) } });
-
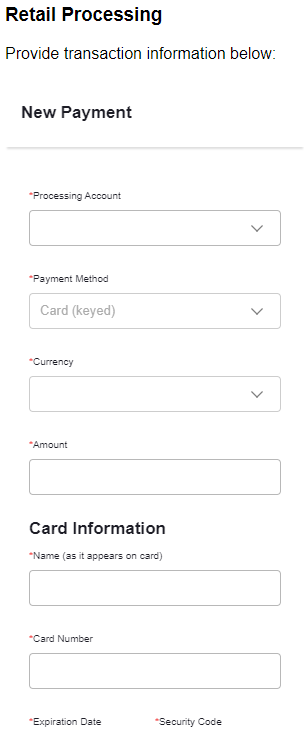
When your trusted user accesses the webpage, the user sees the retail iframe for running a transaction, as in the screenshot of the top of the form shown here:\
-
After the iframe loads, the user selects the appropriate value from the Processing Account field. Then the Payment Method field: Card (keyed), eCheck (keyed), or Saved Payment Methods.
NoteIf you do not see the Payment Method field, your account is not configured for retail transactions.
If this is the case, contact Integrations Support for help getting set up before proceeding.
-
Then, the user completes any necessary information for the transaction, such as currency and amount, and for the customer such as the payment and billing information, before clicking the Pay $X.XX button.
-
The iframe sends the
successevent that your event listener can capture and then perform whatever actions you want, such as hiding the iframe and displaying a confirmation message. This event includes an object that is similar to the response returned from the Run card transaction endpoint.
Next steps
After running a transaction, you can check the status of the transaction or transactions with the APIs:
- If this was an auth only transaction, the next step is to capture the transaction. You can use the Capture a transaction endpoint or go to your Nexio dashboard to locate the transaction and capture it there.
- View transaction by payment ID - Because you get the
paymentId(asid) in the response for a transaction, this endpoint is useful for quickly getting transaction information and updates. - View transaction by transaction ID - You can use this endpoint instead of View transactions when you only need to get information about a single transaction and in order to get all response parameters related to the transaction without needing to request them specifically.
- View transactions - For viewing information about one or more transactions and being able to filter the results based on specified parameters.
Updated 10 months ago