Apple Pay integration guide
![]() Apple Pay is a payment provider allowing consumers to pay using their payment methods saved to their Apple Pay account. This section is intended to help you implement Apple Pay based on your preferred integration workflow.
Apple Pay is a payment provider allowing consumers to pay using their payment methods saved to their Apple Pay account. This section is intended to help you implement Apple Pay based on your preferred integration workflow.
Services and compatibility
| Payment method gateway name | Apple Pay through Authorize.net Apple Pay through Cybersource |
| Supported transaction types | |
| Supported integration methods |
|
| Supported processing currencies | For Apple Pay through Authorize.net:
|
| Webhook event types |
|
| Supported devices | Devices compatible with Apple Pay |
Configuration
In order to use Apple Pay with your merchant account, you must first work with integrations to add it to your account.
Then, you must go through the following information and steps.
Prerequisites
In order to configure your account for use with Apple Pay, you need the following:
-
An Apple computer
-
An Apple Developer account. For more information about the program, see the Apple Developer site.
-
Enrollment in the Apple Developer Program as an organization, including a D-U-N-S Number for your legal entity per these enrollment requirements.
Note: If you are not sure of what a D-U-N-S Number is for your business, you can look it up online or apply for one by following the instructions on the D-U-N-S Number support page.
-
A connection (gateway) account
Configuration tasks
After you complete the above prerequisites, you are ready to begin the configuration tasks:
- Create an Apple Pay merchant ID
- Create a payment processing certificate
- Create a merchant identity certificate
- Verify your domain
- Provide your configuration settings to Integrations Support
Note: When integrating Apple Pay to multiple environments, you need to verify the domain for each environment. However, you only need to complete the first three tasks one time.
Create an Apple Pay merchant ID
Follow these steps to create an Apply Pay merchant ID.
- Go to the Apple Developer portal.
- Sign in to your account.
- Select Certificates, IDs & Profiles.
- Select Identifiers.
- On the Identifiers screen, click the + (plus sign) button.
- Click the Merchant ID radio button, then click Create.
- Fill in the required fields.
- Copy or note the Merchant ID. You need it when you create the payment processing certificate and the merchant identity certificate.
Create a payment processing certificate
Contact Integrations Support to provision a supported gateway and get a payment processing certificate.
Follow these steps to upload the certificate to Apple Pay.
- Go to the Apple Developer portal.
- Sign in to your account.
- Select Certificates, IDs & Profiles.
- Click the Upload button and upload the certificate.
Create a merchant identity certificate
In this task, you create the certificate signing request (CSR) for a Merchant Identity Certificate. (The steps below are adapted from Apple's tutorial on how to create a certificate signing request.)
- Launch Keychain Access located in
/Applications/Utilities. - Choose Keychain Access > Certificate Assistant > Request a Certificate from a Certificate Authority.
- In the Certificate Assistant dialog, type an email address in the User Email Address field. (Any email address works.)
- Type the Common Name. You may pick a common name of your choice. For example, "Nexio Apple Pay Merchant Cert".
- Leave the CA Email Address field empty.
- Choose Saved to disk, and click Continue.
- The default Save As name is something like
CertificateSigningRequest.certSigningRequest. You can name it whatever you want. For example,NexioApplePayMerchant.certSigningRequest.
Successful completion of the above steps creates the following files:
- CSR (saved to the location you selected with the name you chose in step 7)
- A private key (saved to the KeyChain tool, with the same name as the Common Name you chose in step 4)
- A public key (saved to the KeyChain tool, with the same name as Common Name you chose in step 4)
Upload the CSR to Apple's developer portal
- Go to the Apple Developer Portal.
- Click to expand the App IDs dropdown menu (in the top right).
- Select Merchant IDs.
- Select the desired merchant ID. (If you do not see the merchant ID, create it now).
- Under "Apple Pay Merchant Identity Certificate", click Create Certificate.
- Upload the merchant identity certificate you created previously.
- Download the certificate. Name it
NexioApplePayMerchant.cer.
Export the private key
-
Go back to the KeyChain tool on your Apple computer.
-
Right-click on the private key and select Export.
-
Export as 'NexioApplePayMerchantKey.p12'.
Note: If "p12" is grayed out, you chose the wrong key. Select a different key.
Convert the format of the private key
Convert the format of the private key you downloaded in step 3 of Export the private key. Convert it first to a PEM certificate, then to a Base64 string.
-
Open the terminal.
-
Navigate to the directory where the private key is saved (Documents, by default):
cd Documents. -
Create the privatePem by typing the following in the terminal:
openssl pkcs12 -in NexioApplePayMerchantKey.p12 -out NexioApplePayMerchantKey.pem -nodes -clcerts -
Convert .pem file to a Base64 string:
base64 -i NexioApplePayMerchantCRT.pem
Convert the format of the Apple Pay certificate
Convert the format of the certificate you downloaded in step 3 of Convert the format of the private key. Convert it first to a PEM certificate, then to a Base64 string.
-
Navigate to the directory where the private key is saved (Downloads, by default):
cd Downloads. -
Create the certPem by typing the following in the terminal:
openssl x509 -inform DER -outform PEM -in NexioApplePayMerchant.cer -out NexioApplePayMerchantCRT.pem -
Convert the files to base64 strings:
base64 -i NexioApplePayMerchantCRT.pem
Verify your domain
Follow these steps to verify the domain to be used with Apple Pay. If you have multiple domains (for example, for development environments) repeat these steps for each.
- Go to the Apple Developer portal.
- Click Merchant Domains.
- Click Add Domain.
- Enter the URL of the domain you plan to use. Click Save.
- Apple Pay will provide you with a text file to download and a URL. Download the file and copy the URL, you will use both in the next step.
- Host the text file at the exact URL provided by Apple.
Provide your configuration settings to Integrations Support
After you have completed all of the previous tasks, contact Integrations Support to provide them with the following:
-
Your Apple Pay Merchant ID.
-
Your gateway credentials.
-
The verified domain for processing.
If you have multiple verified domains for testing purposes, you can dynamically choose the domain by providing the appropriate value for the
data.applePayDomainparameter when you request a one-time-use token. (For more information, see step 4 of the Button Iframe URLs tutorial).
Troubleshoot the configuration or platform
Apple Pay and Apple Developer use different platforms. You need to accept the terms and conditions on each account separately.
If you are experiencing difficulties on one of the platforms, please contact the appropriate support:
Integration flow
The general integration flow is the same for all APMs and depends on which APMs you want to integrate with.
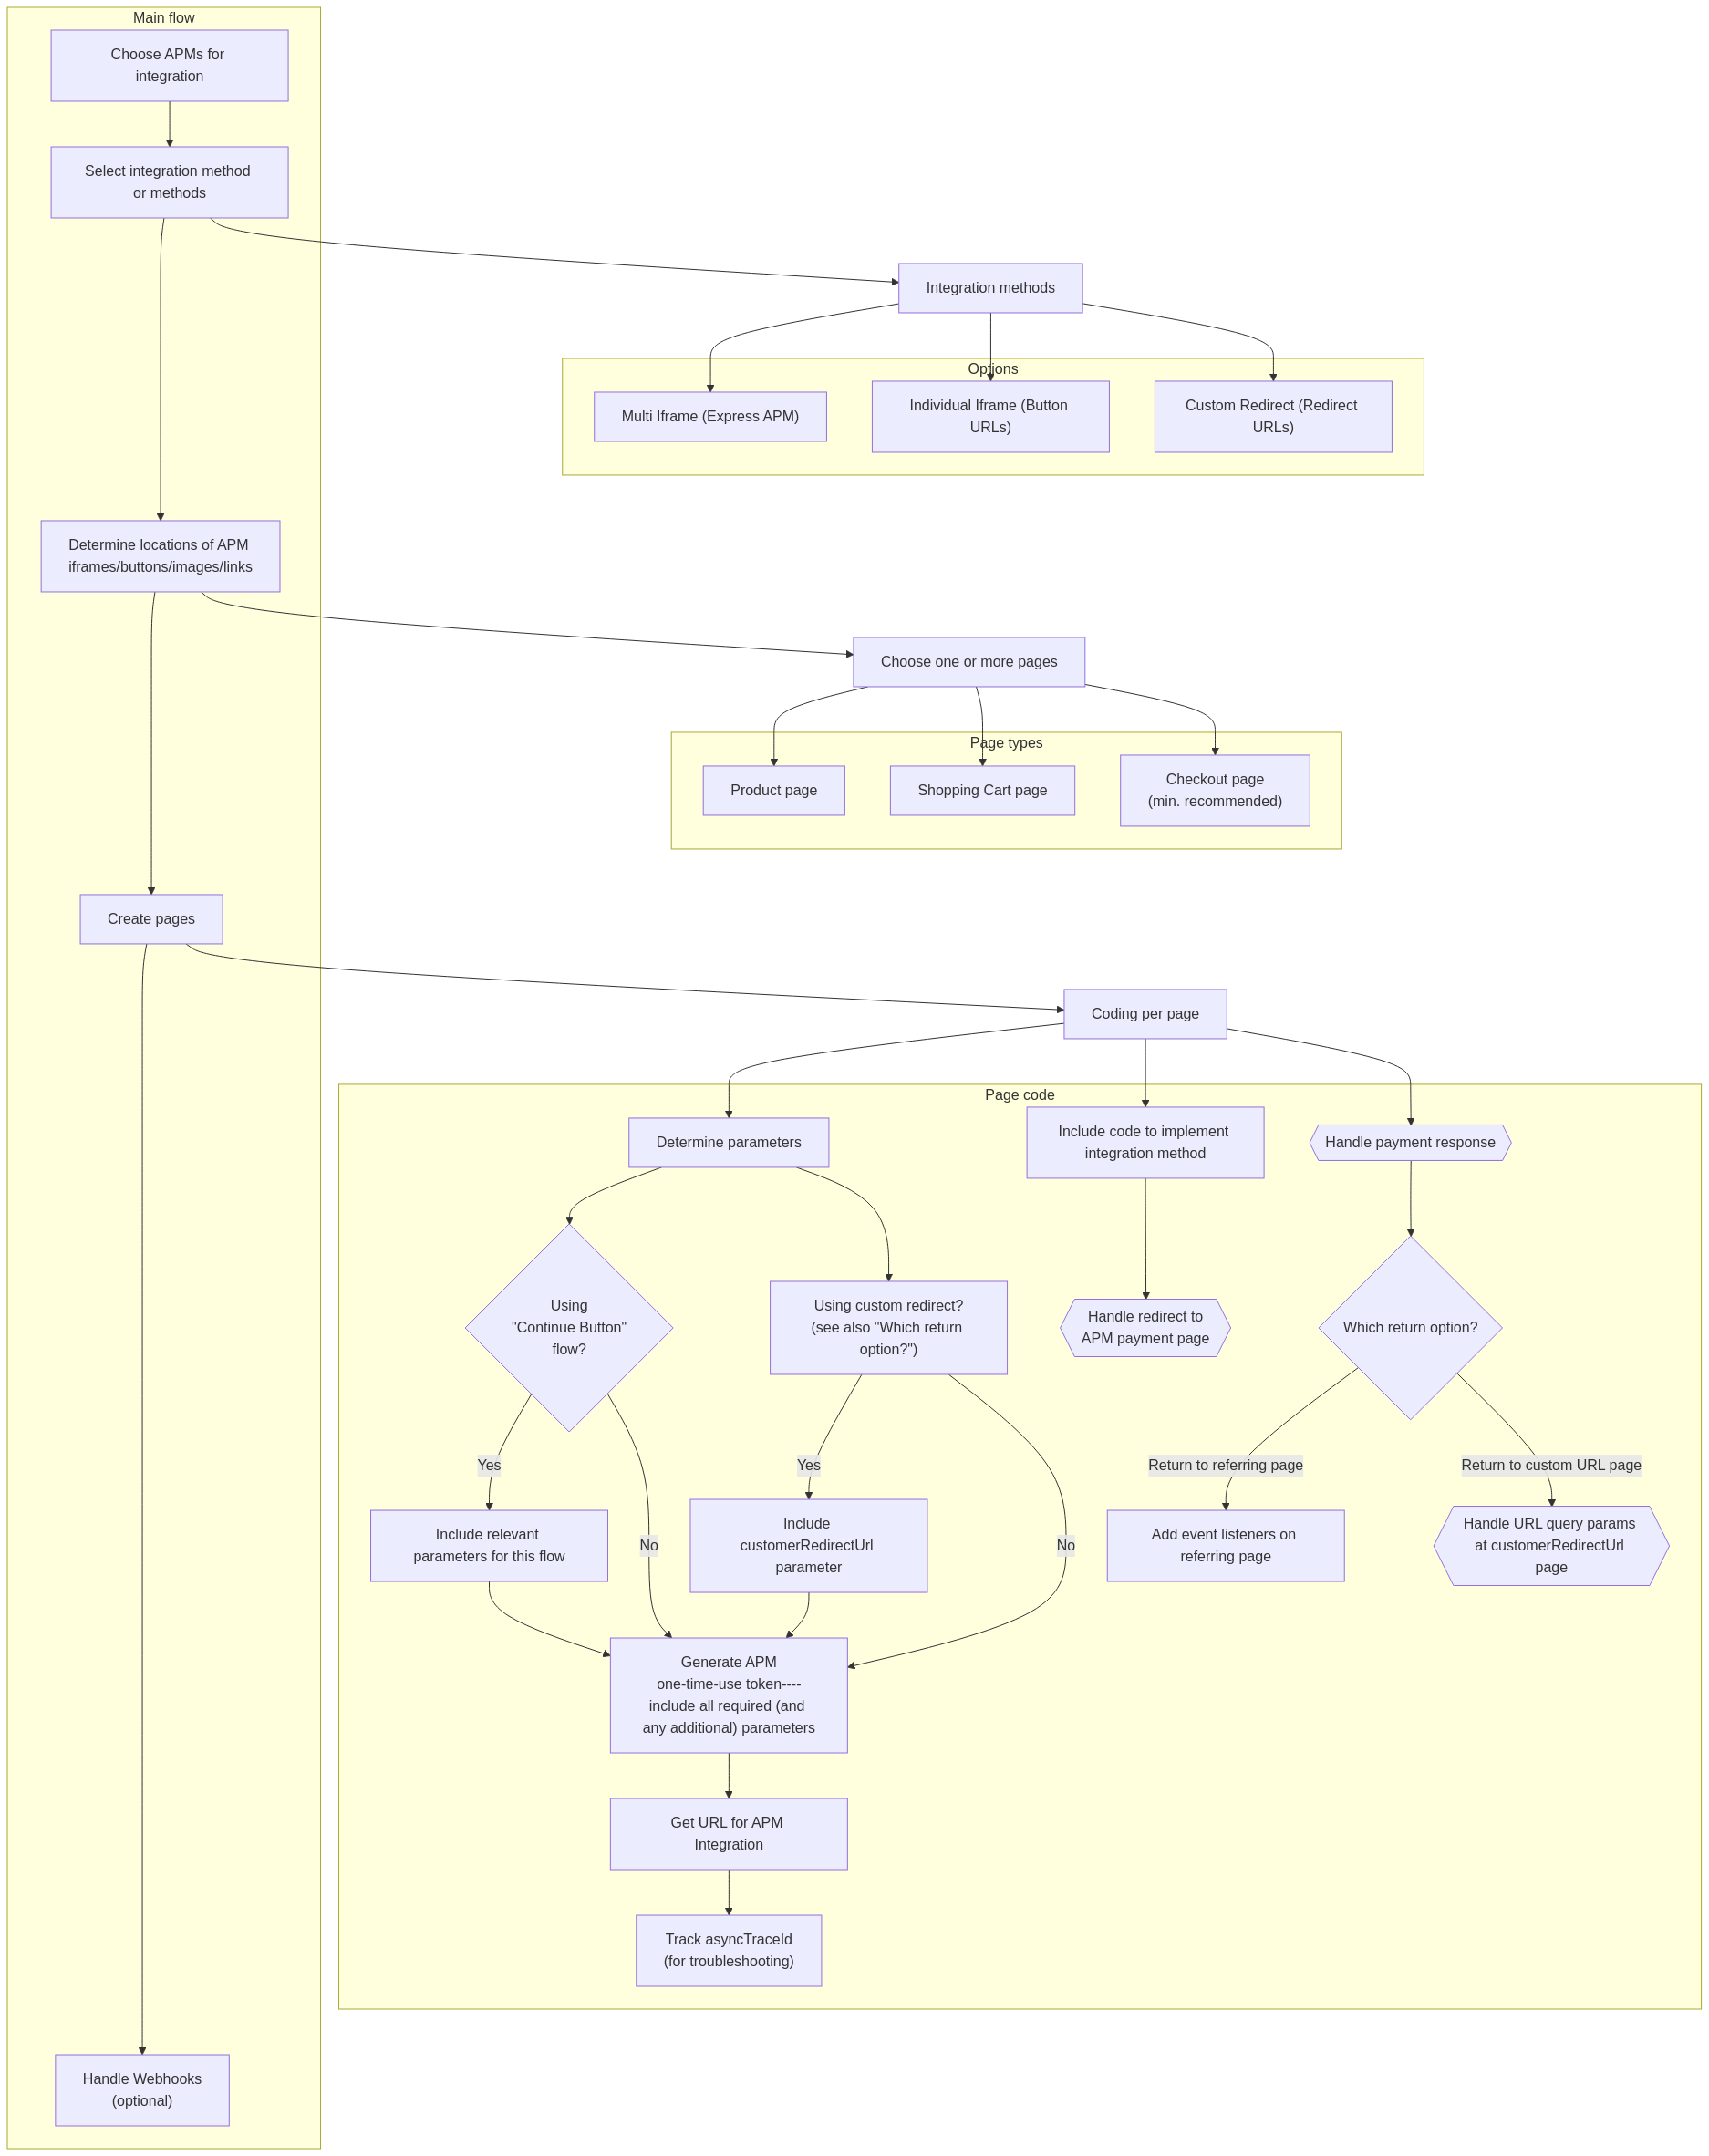
First, the decision about which APMs to use affects the possible integration methods and the required parameters for the APM one-time-use token request. Use the information from this integration guide with the information from any other applicable integration guides as you plan your integration. In order to integrate an APM after it has been added to your merchant account, you need to decide which integration method you want to use, which may be dependent on the method you have used with other APMs. Note that you can mix and match those methods for each APM but your page may not look as usable or clear as when using a single method. There are pros and cons to each method. For additional information, see the Supported integration methods for APMs topic.
After deciding on the integration method, you need to make sure that you know which currencies are supported (for an overview of all APMs, see Supported currencies for APMs) and which parameters are required in a request. This is especially important for integrations with multiple APMs. Make sure that all the required parameters are accounted for across all the APMs used. For an overview of common parameters across the APMs, see Common required parameters.
You also need to decide whether you want to specify where you want the APM to return the customer after they pay or just to the page that opened the APM payment page. If you specify a page, you must include the customerRedirectUrl parameter in the APM one-time-use token request, you need to create that page on your site, and you need to create the code for the page that parses the query string parameters passed along with that redirect URL. Note that you must use this option when using the custom integration method. If you use the referring page, that page needs to listen for event messages.
In addition to either of the previous options, you should also configure webhooks to get event messages. This is especially helpful for instances where the APM process fails or there are problems with a transaction request.
Next, decide on where you are displaying the APM as a payment option (on a product page, shopping cart page, checkout page, or some combination of those. For example, PayPal (with Braintree) has a “Continue button” flow that you can use on a shopping cart page, which may affect how you integrate.
On each page where you are putting the APM option, first you need an APM one-time-use token. This is where you can send most of the required parameters. If necessary, you can also send customization options for the iframe display (whether multi or individual). This returns URLs and an APM token that you use for the integration method you want. Use this URL for the iframe or link. Each APM gets a different URL (except for the multi-iframe method, which gets one for all APMs that are supported).
You will also want to note the asyncTraceId (it is the same for all APMs returned from the APM one-time-use token) because you can use that to track the status of the transaction and narrow down the problem when troubleshooting.
Many of the APMs open a new webpage when the customer selects to pay using that method. The ideal payment flow returns control to the merchant website after the customer authenticates and pays from the APM website. As mentioned previously, your integration needs to include code that gets the data returned from the APM. This will be in the URL query parameters or as event messages or as webhooks. Use this information for display a payment success or failure message for the customer.
Required fields
The following table shows the required and optional fields for Apple Pay transactions in the Create APM one-time-use token request.
| Field | Required? | Description |
|---|---|---|
data.amount | Yes | The transaction amount. |
data.currency | Yes | The three-character ISO currency code for the transaction. For Apple Pay through Authorize.net ( applePayAuthNet), supported currencies are CAD and USD.For Apple Pay through Cybersource ( applePayCyberSource), supported currencies are AUD, CAD, and USD. |
data.customer.orderNumber | Yes | The order number. |
data.customer.firstName | Yes | The customer's first name, as it is set for the payment method. |
data.customer.lastName | Yes | The customer's last name, as it is set for the payment method. |
data.customer.email | Yes | The customer's email address. |
data.customer.customerRef | Yes | Customer identifier. You can use this field to pass a customer ID to the APM or to manage user subscriptions. |
data.applePayDomain | Conditional | Allows you to run a transaction through a verified domain other than the default (for example, for a test environment). For specific details related to this parameter, see the Create APM one-time-use token endpoint. |
data.description | Conditional | A description of the transaction. Required for applePayCyberSource.Optional for applePayAuthNet. |
data.customer.billToAddressOne | Conditional | The street address for the customer. Required for applePayCyberSource.Optional for applePayAuthNet. |
data.customer.billToCity | Conditional | The city for the address record. Required for applePayCyberSource.Optional for applePayAuthNet. |
data.customer.billToState | Conditional | The state or province on file with the payment provider. (If in the US, this must be the two-character state abbreviation). Required for applePayCyberSource.Optional for applePayAuthNet. |
data.customer.billToPostal | Conditional | The postal code on file. Required for applePayCyberSource.Optional for applePayAuthNet. |
data.customer.billToCountry | Conditional | The two-character (Alpha-2) ISO country code. |
data.customer.billToAddressTwo | No | Additional street address information, if required. |
data.customer.billToPhone | No | The billing phone number. |
data.customer.shipToAddressOne | No | The shipping address, if different from the billing address. |
data.customer.shipToAddressTwo | No | Additional shipping address information, if required. |
data.customer.shipToCity | No | The shipping city. |
data.customer.shipToState | No | The shipping state or province. (If in the US, this must be the two-character state abbreviation). |
data.customer.shipToPostal | No | The shipping postal code. |
data.customer.shipToCountry | No | The two-character (Alpha-2) ISO shipping country code. |
data.customer.shipToPhone | No | The shipping phone number. |
data.cart.items[n].description | No | A description of the item. |
data.cart.items[n].price | No | The price per item |
data.cart.items[n].quantity | No | The quantity sold. |
data.cart.items[n].item | No | Item number or code. |
data.descriptor | No | Include this parameter to dynamically change the descriptor on the customer's statement. Optional for applePayCyberSource.Not allowed for applePayAuthNet. |
data.paymentMethod | No | The identifier for the alternative payment method. Use this parameter when you want to only return the Apple Pay iframe button URL (rather than data for all payment methods associated with the account). The value to use is applePayAuthNet or applePayCyberSource, depending on your integration. |
isAuthOnly | No | Set to true to run an auth only transaction. |
processingOptions.merchantId | No | The Nexio merchant ID (MID). |
processingOptions.paymentOptionTag | No | A custom value used to route transactions to a specific gateway or merchant account. |
uiOptions.css | No | The URL where your custom CSS file is hosted. |
Example requests
The following are example one-time-use token requests for Apple Pay.
curl -X POST https://api.nexiopaysandbox.com/apm/v3/token \
  -H 'Content-Type: application/json' \
  -H 'Accept: application/json' \
  -H 'Authorization: Basic [Base64_encoded_login]'
  -d '{
  "data": {
    "amount": 4.00,
    "currency": "USD",
    "paymentMethod": "applePayAuthNet",
    "customer": {
      "orderNumber": "12345678",
      "firstName": "John",
      "lastName": "Doe",
      "email": "[email protected]"
    }
  }
}'
curl -X POST https://api.nexiopaysandbox.com/apm/v3/token \
-H 'Content-Type: application/json' \
-H 'Accept: application/json' \
-H 'Authorization: Basic [Base64_encoded_login]'
-d '{
"data": {
"amount": 4.00,
"currency": "USD",
"description": "test purchase",
"paymentMethod": "applePayCyberSource",
"customer": {
"orderNumber": "12345678",
"firstName": "John",
"lastName": "Doe",
"email": "[email protected]",
"billToAddressOne": "123 Test St",
"billToCity": "Testerville",
"billToState": "UT",
"billToPostal": "12345",
"billToCountry": "US"
}
}
}'{
"expiration": "2018-09-18T15:43:05.664Z",
"token": "830d36f6-a5e3-4455-9600-3a55b63e2fc2",
"asyncTraceId": "830d36f6-a5e3-4455-9600-3a55b63e2fc2",
"expressIFrameUrl": "https://www.api.nexiopaysandbox.com/v3?token=830d36f6-a5e3-4455-9600-3a55b63e2fc2",
"redirectUrls": [],
"buttonIFrameUrls": [
{
"paymentMethod": "payPal",
"url": "https://api.nexiopaysandbox.com/apm/v3?token=830d36f6-a5e3-4455-9600-3a55b63e2fc2&paymentMethod=payPal"
},
{
"paymentMethod": "applePayAuthNet",
"url": "https://api.nexiopaysandbox.com/apm/v3?token=830d36f6-a5e3-4455-9600-3a55b63e2fc2&paymentMethod=applePayAuthNet"
},
{
"paymentMethod": "applePayCyberSource",
"url": "https://api.nexiopaysandbox.com/apm/v3?token=830d36f6-a5e3-4455-9600-3a55b63e2fc2&paymentMethod=applePayCyberSource"
}
]
}For the multi iframe integration method: You use the expressIFrameUrl value in the steps for the transaction.
For the individual iframe option: You use the buttonIFrameUrls.url of the Apple Pay APM for the transaction. Also, you use the scriptUrl.
Transaction types and integration methods
Regardless of the integration method workflow you implement, consumers are redirected to Apple Pay to complete their transactions.
Nexio supports the following transaction types for Apple Pay:
- Auth Only
- Sale
- In an iframe that displays all payment methods available to the customer (based on the customer’s location and the merchant’s configured payment methods)
- In an individual iframe
- Void
- Capture
- Refund
Testing Data
For testing data, see Apple Pay’s Sandbox Testing page.
Response handling
In the one-time-use token request, Apple Pay gets returned in the paymentMethod parameter as applePayAuthNet or applePayCyberSource.
Nexio responds with transaction results in event messages.
For information about how to run each of the integration workflows, see Transaction types and integration methods above.
Webhooks
In addition to the event message, if your merchant account is configured to receive webhooks, Nexio provides responses to the webhook URLs that have been registered. For additional information about webhooks, see the Webhooks topic.
The response you get depends on the type of webhooks you have configured.
New webhooks
For Apple Pay, the new webhook eventType will always be TRANSACTION with a processMethod value of 20 (for APMs).
Those TRANSACTION webhooks will also contain a numerical value for transactionStatus whenever that status changes. For specific information about the status values, see the Transaction status reference tables in the "Constant transaction values" topic. You can also reference the "Status workflows" table below.
For information about what information gets received in a webhook and how to use it, see the Receiving webhooks topic.
Legacy webhooks
For Apple Pay, these are the possible legacy webhook event types:
- TRANSACTION_AUTHORIZED
- TRANSACTION_CAPTURED
- TRANSACTION_REFUNDED
- TRANSACTION_SETTLED
- TRANSACTION_VOIDED
For further explanation of the webhook event types, see the legacy webhook Event types table.
Status workflows
The status of a successful transaction with Apple Pay varies, depending on the options you choose.
| Sale | When isAuthOnly is false, successful sale transactions have the following statuses:
|
| Auth only | When isAuthOnly is true, successful sale transactions have the following statuses:
|
| Capture | Successful capture transactions have the following status:
|
| Void | Successful void transactions have the following status:
|
| Refund | Successful refund transactions have the following status:
|
*Pending status displays as "authorized" or "AUTHORIZED" in the Nexio Dashboard; it displays as 10, meaning "authorized", in the response when querying transactions (for more information about transactionStatus, see the table).
Next steps
Now, you are ready to get started with running transactions:
If you have any additional questions or feedback, see Contact us.
Updated 10 months ago