Afterpay through Citcon integration guide
![]() Afterpay through Citcon is a payment provider allowing customers to pay using supported wallet apps on their mobile device. This guide is intended to help you implement Afterpay through Citcon based on your preferred integration workflow.
Afterpay through Citcon is a payment provider allowing customers to pay using supported wallet apps on their mobile device. This guide is intended to help you implement Afterpay through Citcon based on your preferred integration workflow.
Services and compatibility
| Payment method gateway name | Citcon |
| Supported transaction types | |
| Supported integration methods |
|
| Supported processing currencies | CAD, USD |
| Webhook event types |
|
Gateway-specific information
Nexio does not need any additional gateway information. However, you can see the Afterpay website, if needed.
Configuration
Apart from working with Integrations to add Afterpay through Citcon as a payment method, you do not need to do any other configuration steps.
Integration flow
The general integration flow is the same for all APMs and depends on which APMs you want to integrate with.
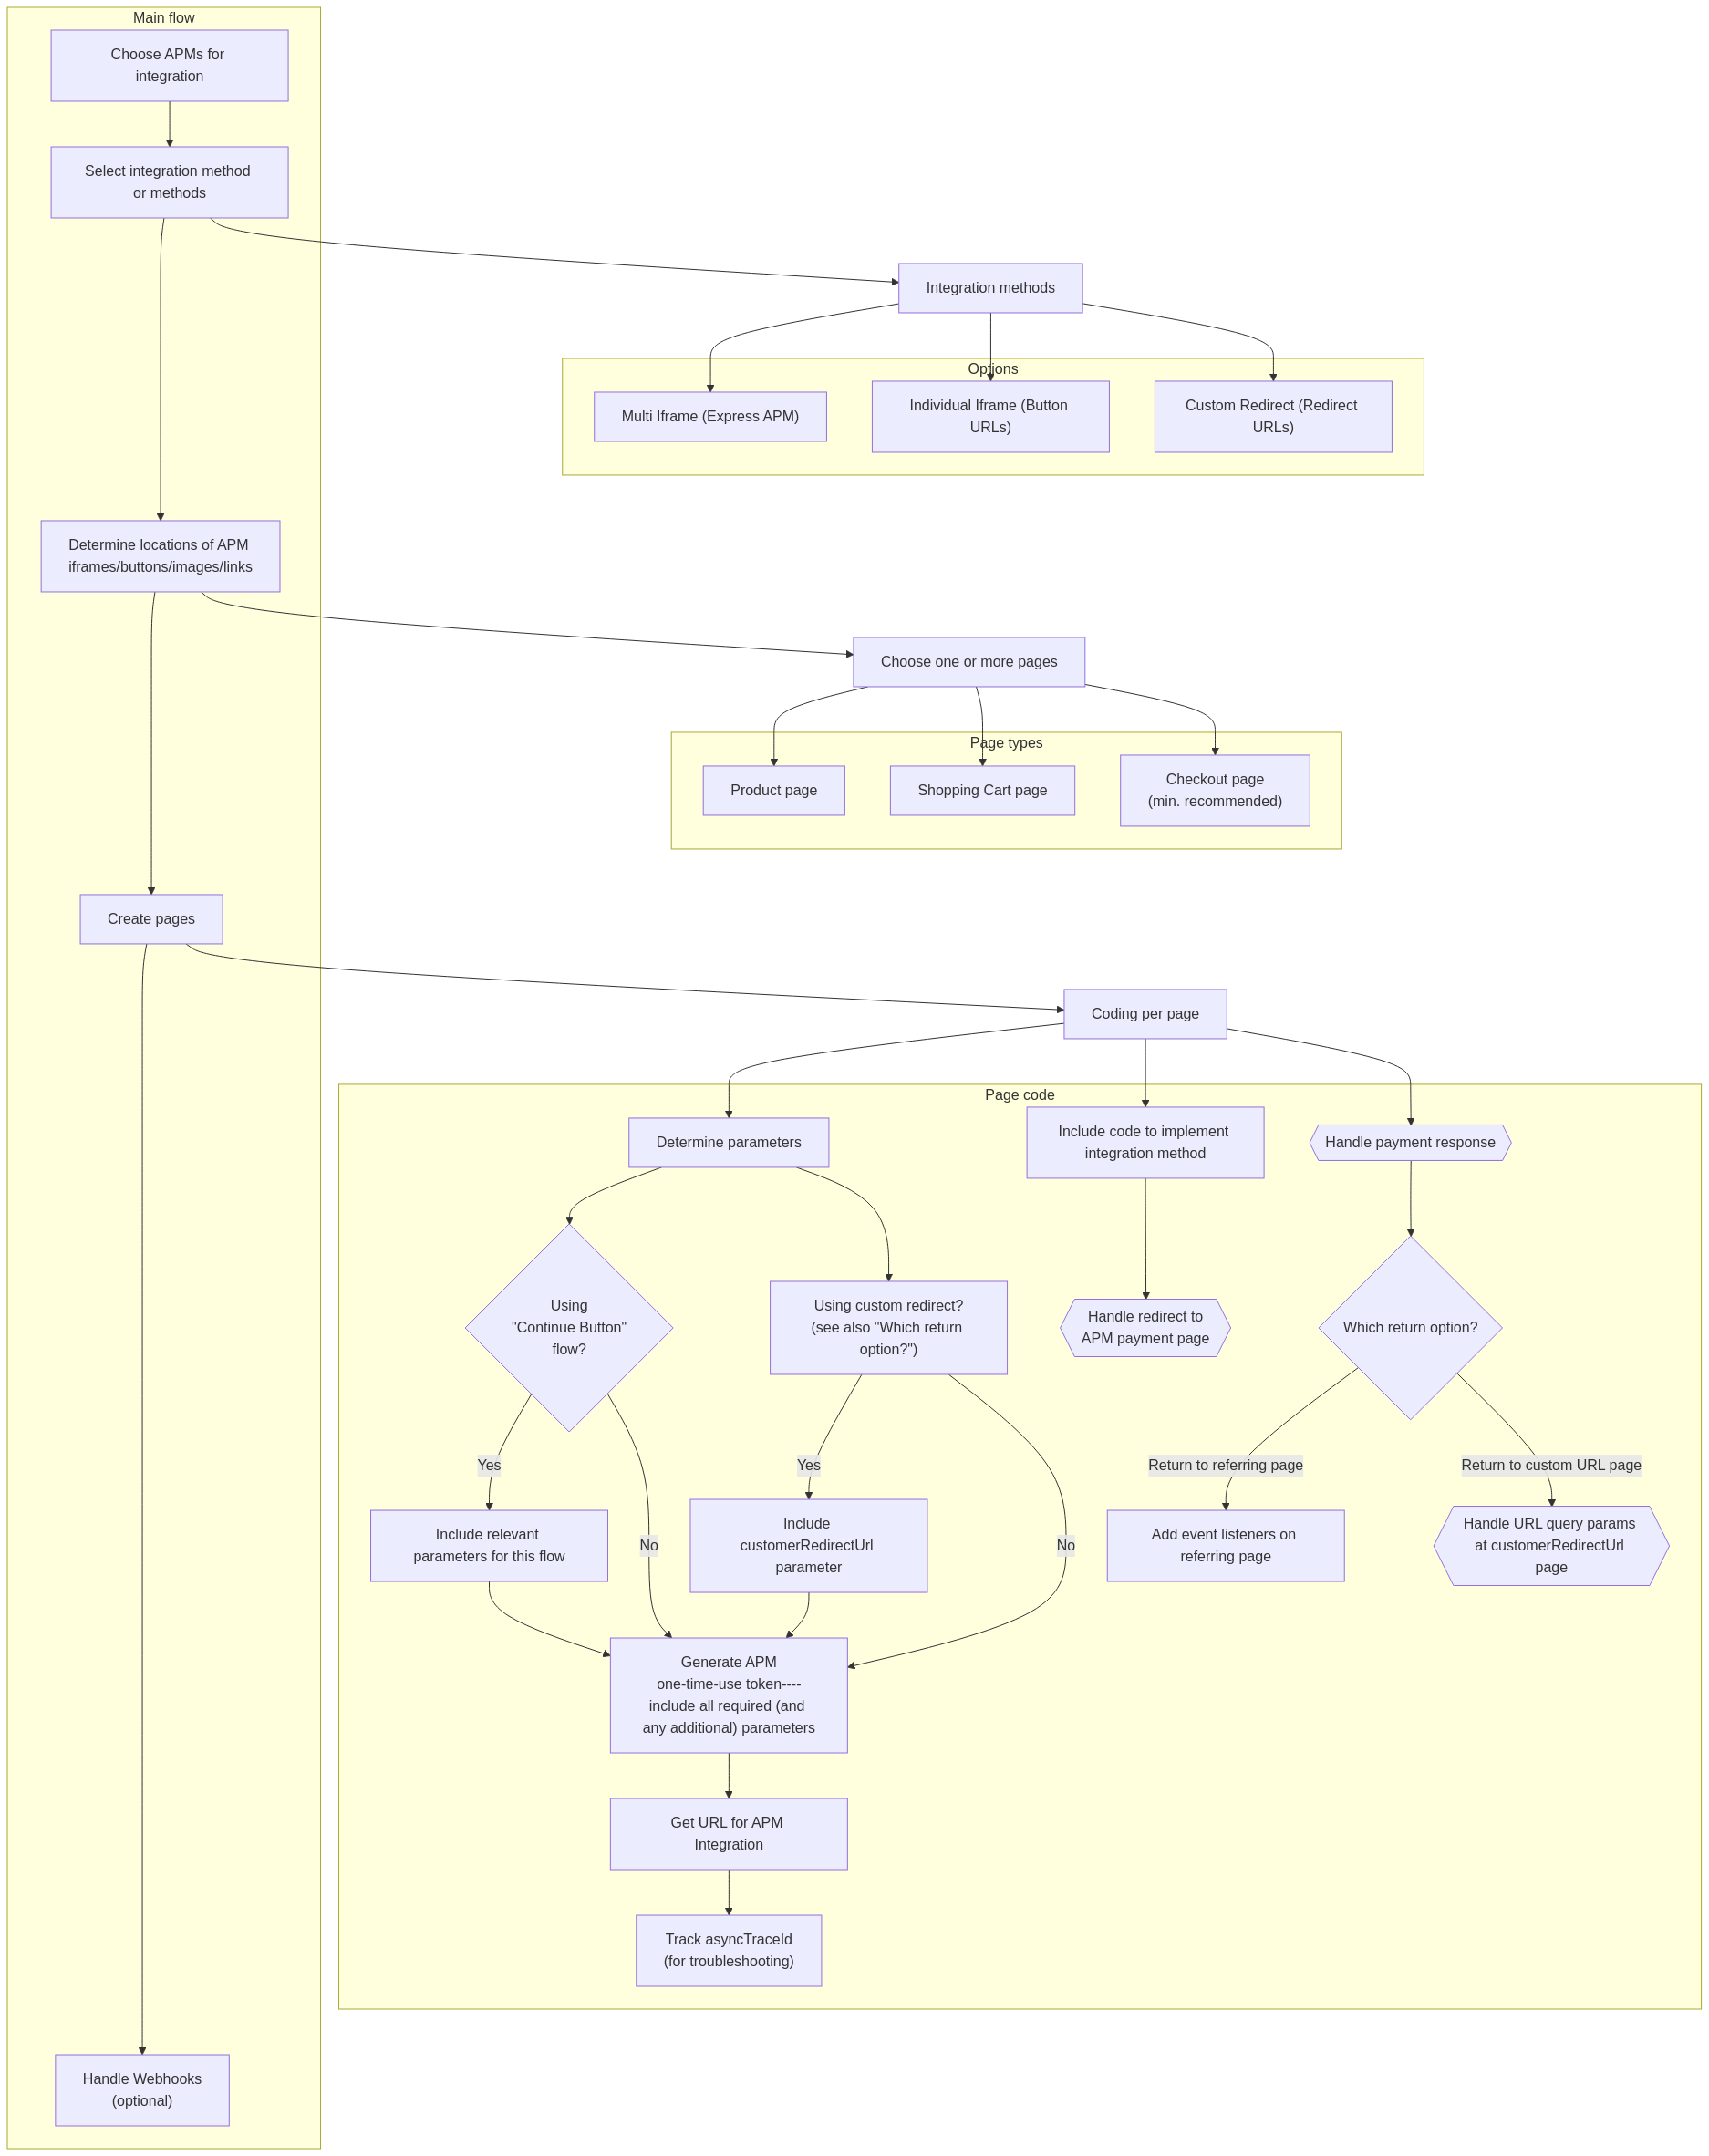
First, the decision about which APMs to use affects the possible integration methods and the required parameters for the APM one-time-use token request. Use the information from this integration guide with the information from any other applicable integration guides as you plan your integration. In order to integrate an APM after it has been added to your merchant account, you need to decide which integration method you want to use, which may be dependent on the method you have used with other APMs. Note that you can mix and match those methods for each APM but your page may not look as usable or clear as when using a single method. There are pros and cons to each method. For additional information, see the Supported integration methods for APMs topic.
After deciding on the integration method, you need to make sure that you know which currencies are supported (for an overview of all APMs, see Supported currencies for APMs) and which parameters are required in a request. This is especially important for integrations with multiple APMs. Make sure that all the required parameters are accounted for across all the APMs used. For an overview of common parameters across the APMs, see Common required parameters.
You also need to decide whether you want to specify where you want the APM to return the customer after they pay or just to the page that opened the APM payment page. If you specify a page, you must include the customerRedirectUrl parameter in the APM one-time-use token request, you need to create that page on your site, and you need to create the code for the page that parses the query string parameters passed along with that redirect URL. Note that you must use this option when using the custom integration method. If you use the referring page, that page needs to listen for event messages.
In addition to either of the previous options, you should also configure webhooks to get event messages. This is especially helpful for instances where the APM process fails or there are problems with a transaction request.
Next, decide on where you are displaying the APM as a payment option (on a product page, shopping cart page, checkout page, or some combination of those. For example, PayPal (with Braintree) has a “Continue button” flow that you can use on a shopping cart page, which may affect how you integrate.
On each page where you are putting the APM option, first you need an APM one-time-use token. This is where you can send most of the required parameters. If necessary, you can also send customization options for the iframe display (whether multi or individual). This returns URLs and an APM token that you use for the integration method you want. Use this URL for the iframe or link. Each APM gets a different URL (except for the multi-iframe method, which gets one for all APMs that are supported).
You will also want to note the asyncTraceId (it is the same for all APMs returned from the APM one-time-use token) because you can use that to track the status of the transaction and narrow down the problem when troubleshooting.
Many of the APMs open a new webpage when the customer selects to pay using that method. The ideal payment flow returns control to the merchant website after the customer authenticates and pays from the APM website. As mentioned previously, your integration needs to include code that gets the data returned from the APM. This will be in the URL query parameters or as event messages or as webhooks. Use this information for display a payment success or failure message for the customer.
Required fields
The following table shows the required and optional fields for Afterpay through Citcon transactions in the Create APM one-time-use token request.
| Field | Required? | Description |
|---|---|---|
|
Yes |
The transaction amount. |
|
Yes |
The three-character ISO currency code for the transaction. |
|
Yes |
The street address for the customer. |
|
Yes |
The city for the address record. |
|
Yes |
The state or province on file with the payment provider. (If in the US, this must be the two-character state abbreviation). |
|
Yes |
The postal code on file. |
|
Yes |
|
|
Yes |
The billing phone number. |
|
Yes |
The customer's email address. |
|
Yes |
The customer's first name, as it is set for the payment method. |
|
Yes |
The customer's last name, as it is set for the payment method. |
|
Yes |
The order number. |
|
No |
The URL to which the customer will be redirected after completing their payment. The customer will be sent here upon successful or failed payment. This URL must use the HTTPS protocol. |
|
No |
Item number or code. |
|
No |
A description of the item. |
|
No |
The quantity sold. |
|
No |
The price per item. |
|
No |
Additional street address information, if required. |
|
No |
Customer identifier. You can use this field to pass a customer ID to the APM or to manage user subscriptions. |
|
No |
The invoice number. |
|
No |
The shipping address, if different from the billing address. |
|
No |
Additional shipping address information, if required. |
|
No |
The shipping city. |
|
No |
The shipping state or province. (If in the US, this must be the two-character state abbreviation). |
|
No |
The shipping postal code. |
|
No |
The two-character (Alpha-2) ISO shipping country code. |
|
No |
The shipping phone number. |
|
No |
Nexio stores information in custom fields and passes custom fields to the gateway. |
|
No |
A description of the transaction. |
|
No |
Include this parameter to dynamically change the descriptor on the customer's statement. |
|
No |
The identifier for the alternative payment method. Use this parameter when you want to only return the Afterpay through Citcon iframe button URL (rather than data for all payment methods associated with the account). |
|
No |
Set to |
|
No |
The Nexio merchant ID (MID). |
|
No |
A custom value used to route transactions to a specific gateway or merchant account. |
|
No |
Set to true to include a submit button in the iframe. |
|
No |
The URL where your custom CSS file is hosted. |
Example requests
The following is an example one-time-use token request for Afterpay through Citcon.
curl -X POST https://api.nexiopaysandbox.com/apm/v3/token \
  -H 'Content-Type: application/json' \
  -H 'Accept: application/json' \
  -H 'Authorization: Basic [Base64_encoded_login]'
  -d '{
  "data": {
    "amount": 4.00,
    "currency": "USD",
    "paymentMethod": "citconAfterpay",
    "customer": {
      "orderNumber": "210058A",
      "firstName": "John",
      "lastName": "Doe",
      "email": "[email protected]",
      "billToAddressOne": "2147 West Silverlake Drive",
      "billToCity": "Scranton",
      "billToState": "PA",
      "billToPostal": "18503",
      "billToCountry": "US",
      "billToPhone": "1555555555"
    }
  }
}'{
"expiration": "2023-09-18T15:43:05.664Z",
"token": "830d36f6-a5e3-4455-9600-3a55b63e2fc2",
"asyncTraceId": "830d36f6-a5e3-4455-9600-3a55b63e2fc2",
"expressIFrameUrl": "https://www.api.nexiopaysandbox.com/v3?token=830d36f6-a5e3-4455-9600-3a55b63e2fc2",
"redirectUrls": [
{
"paymentMethod": "citconAfterpay",
"url": "https://api.nexiopaysandbox.com/apm/v3/popup?token=830d36f6-a5e3-4455-9600-3a55b63e2fc2&paymentMethod=citconAfterpay"
}
],
"buttonIFrameUrls": [
{
"paymentMethod": "sofortCheckout",
"url": "https://api.nexiopaysandbox.com/apm/v3?token=830d36f6-a5e3-4455-9600-3a55b63e2fc2&paymentMethod=sofortCheckout"
},
{
"paymentMethod": "citconAfterpay",
"url": "https://api.nexiopaysandbox.com/apm/v3?token=830d36f6-a5e3-4455-9600-3a55b63e2fc2&paymentMethod=citconAfterpay"
}
]
}For the multi iframe integration method: You use the expressIFrameUrl value in the steps for the transaction.
For the individual iframe option: You use the buttonIFrameUrls.url (of the desired Afterpay paymentMethod) for the transaction.
For the custom redirect option: You use redirectUrls.url of the Afterpay paymentMethod for the transaction.
Transaction types and integration methods
Regardless of the integration method workflow you implement, consumers are redirected to Afterpay to complete their transactions.
Nexio supports the following transaction types for Afterpay through Citcon:
- Auth Only
- Sale
- In an iframe that displays all payment methods available to the customer (based on the customer’s location and the merchant’s configured payment methods)
- In an individual iframe

- Using your own button or image
- In an iframe that displays all payment methods available to the customer (based on the customer’s location and the merchant’s configured payment methods)
- Capture
- Refund
Testing data
Refer to the Citcon Development Tools documentation for testing card numbers and testing information.
Response handling
In the one-time-use token request, Afterpay through Citcon gets returned in the paymentMethod parameter as citconAfterpay.
Nexio responds with transaction results in one of the following ways, depending on your integration workflow:
- Event messages: This applies to integrations that do not pass a
customerRedirectUrlin the request. - Response fields in the URL: This applies to integrations that do provide a
customerRedirectUrlin the request.
For information about how to run each of the integration workflows, see Transaction types and integration methods above.
Webhooks
In addition to one of the above, if your merchant account is configured to receive webhooks, Nexio provides responses to the webhook URLs that have been registered. For additional information about webhooks, see the Webhooks topic.
The response you get depends on the type of webhooks you have configured.
New webhooks
For Afterpay through Citcon, the new webhook eventType will always be TRANSACTION with a processMethod value of 20 (for APMs).
Those TRANSACTION webhooks will also contain a numerical value for transactionStatus whenever that status changes. For specific information about the status values, see the Transaction status reference tables in the "Constant transaction values" topic. You can also reference the "Status workflows" table below.
For information about what information gets received in a webhook and how to use it, see the Receiving webhooks topic.
Legacy webhooks
For Afterpay through Citcon, these are the possible legacy webhook event types:
- TRANSACTION_AUTHORIZED
- TRANSACTION_CAPTURED
- TRANSACTION_REFUNDED
- TRANSACTION_SETTLED
For further explanation of the webhook event types, see the legacy webhook Event types table.
Status workflows
The status of a successful transaction with Afterpay through Citcon varies, depending on the options you choose.
Sale |
When
|
Auth only |
When
|
Capture |
Successful capture transactions have the following status:
|
Refund |
Successful refund transactions have the following status:
|
*Pending status displays as "authorized" or "AUTHORIZED" in the Nexio Dashboard; it displays as 10, meaning "authorized", in the response when querying transactions and in webhooks (for more information about transactionStatus, see the table).
Next steps
Now, you are ready to get started with running transactions:
If you have any additional questions or feedback, see Contact us.
Updated 10 months ago